Showing posts with label GT500. Show all posts

Thursday, August 29, 2024

OLD CROW 3V Mustang: Tries on Slicks, Winter Wheels, Safety Washer and Car Show

 OLD CROW Mustang update time... 

I'll start off with the purchase of some winter wheels. I've been hunting on Facebook Marketplace locally here in Salt Lake for some 18" winter wheels for months. Due to installing the 14" 4 piston brake upgrade, my 17x8 stock wheels no longer fit up front. I sold those for $200 for the set. 

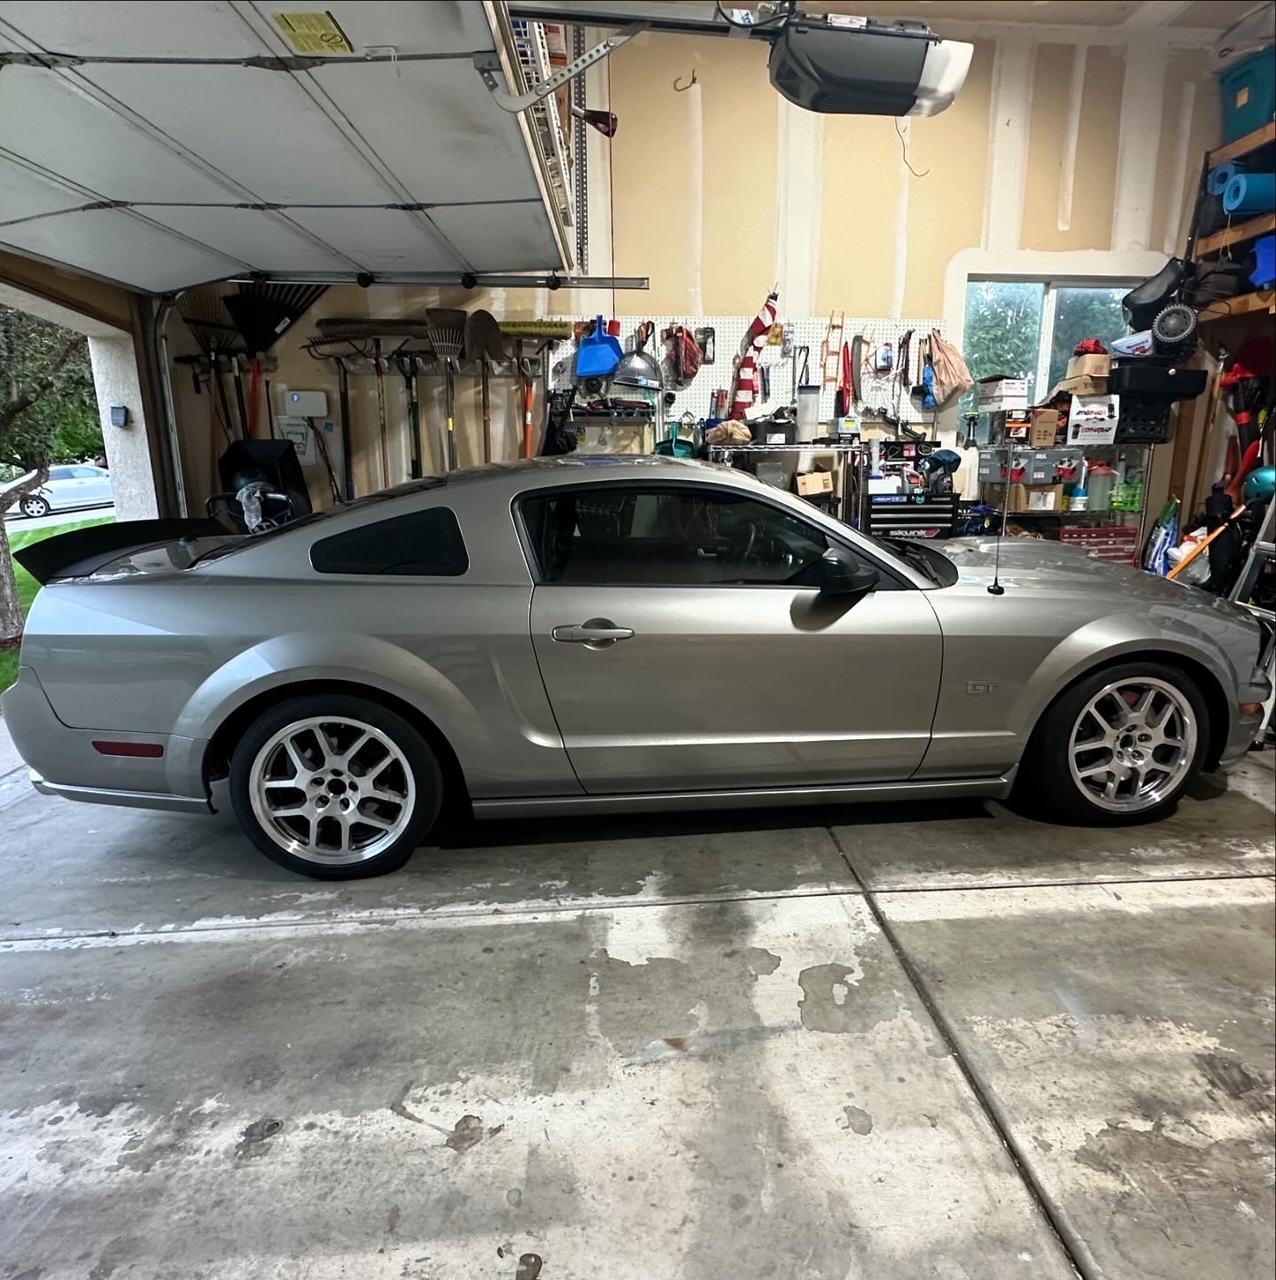
I ended up buying a set of Ford OEM GT500 wheels from the 2007-2009 Shelby GT500 which measure 18x9.5 +45mm. I definitely wanted to have a winter wheel that looks cool and wasn't narrow, like an 18x8, which would have looked just silly on the car. So, I'm happy I found a Mustang wheel that will look great but due to being used, wasn't going to break the bank. I bought these for $380 from a guy in Salt Lake who used them on his Foxbody Mustang. He bought them with a used set of 245/40/18 BFG G-Force R1 slicks and attempted to use them for an autox event and they ended up rubbing like crazy on the front fenders. 


The car looks really good with the GT500 polished wheels. They look pretty dang good in the photo here, but they're kinda rough up close. I did scrub them down good and tried to handle polish them. They definitely need a good polishing wheel. They're perfect for a winter wheel. I plan to put a 275/40/18 or a 285/35/18 on them. The 2009 GT500 ran a 285/40/18 rear tire on it from the factory and a 255/45/18 front tire on the same size wheel. 

I ran this wheel and tire setup for 1 week a couple weeks ago just for fun to see what the wheels looked like on the car and maybe more importantly, how the car handled with slicks. I did the ol' "slalom" back and forth swerving motions to warm up the tires on a back road and man, once the tires got nice and warm, were SUPER responsive on turn in and front grip. The 245/40/18 tires are too narrow and short for the car and looked a little funny. While they are marked as 245 wide, from the picture sitting next to a 295mm wide 200 treadwear tire, they probably measure more like a 265 or 275 wide street tire. 

Next up, I've had a set of Mezier brand "safety washers" that Corey picked up for me from Summit Racing. It took me a bit to understand how these actually worked. Here's a pic of the washer installed. So, the thought process is, if this Cortex bump steer tie rod joint fails, the hoop of the tie rod end could slide right off and the nut on the end would slip right through the hoop and you would not have any steering mechanism any longer. So, with this safety washer, it will keep the tie rod end at least attached so that you will have control of the car to get it off the road and to a safe spot. 

My friend who has autox'd a bunch of Mustangs actually had a bump steer tie rod end fail like this in his driveway. He installed the parts, went to back out of his driveway to go for a test drive and heard a noise and then no longer had steering. So, he highly recommended it.


Here's a quick view from under the car showing the clearance between the wheel and the tie rod end bolt and washer. 
I took advantage while I was under the front of the car to do a nut and bolt check and a general clean up of the hard parts. While there I noticed the passenger side inner fender liner plastic had some rubbing marks from the wide wheel and tire package. Honestly I'll take it. This isn't bad at all for running a 19x11 +50 with a 295/30/19 tire up front. These S197 Mustangs can soak up a lot of tire. Heck, Brent runs a 315/30/19 on his 2005 Mustang track car. He probably has a little bit more rubbing than I do, but still, its minimal and really doesn't need a lot to be able to run that much width up front.

I took the Mustang to the Utah State Layton Autocenter Annual Car Show last weekend. It was a small show, but was fun to get the car detailed the night before and go show it off. 
One of my favorite cars at the show was this 1930 Ford 5 Window Coupe in a 1959 Pontiac color. The car goes with the Pontiac 389 V8 with 3 deuce card set up. I talked to the owner, Joe, for a few minutes, talking cars and asking about the car. He said he built it with his dad who ha since passed away. He finished it about 5 years ago and said he's probably only into it about $6-7k. He had been collecting parts for years. It's an original Ford steel frame from 1930. I love the "traditional hot rod" style this was built in. Traditional means loosely that the car looks like it could have been built in the 40's - 50's using OEM parts from various manufacturers. This is my favorite style of hot rod and it would be so fun to build something like this in the future.

On the other end of the spectrum from that sweet 1930 Ford Coupe is this 2001 Honda S2000 owned by my friend Daniel. I met Daniel a few years ago when I had the 1999 red Honda Hatchback. Daniel had the silver EK Hatchback with Enkei RPF1 wheels. Anyway, that car got wrecked and luckily Daniel and his wife were not too seriously injured. Daniel decided to get something he really wanted instead of starting with another base trim economy car like the Civic. He found this 2001 AP1 Honda S2000 locally in Utah and then started to add his touches to it. The Front lip, side spats and trunk spoiler are Honda OEM parts, along with a cool Spoon inspired hardtop. The wheels are 17x8 front and 17x9 rear Regamaster EVO wheels with 225 and 255 wide sticky tires. It looks great!


Rear view of the S2000. I took this pic because just look at that really nice wheel and tire fitment. 
Check out who else came! Yep, Max, my neighbor who bought my 2002 WRX, brought it out to the Car Show too. I texted probably 8 of my neighbors who are into cars to come show off their cars. It's interesting to me to see the difference in the silver colors of the WRX and the Mustang. 


Here's a great photo of OLD CROW going for a canyon/mountain/touge run 2 weekends ago. I got up early and took the Mustang up to East Canyon Park Reservoir (the lake you see in the background here) and then up to the top of the mountain and back down into Salt Lake passing Little Dell Reservoir. It was a great drive up, the car handled great and the news were beautiful. I probably should have turned around at the top and gone back down the back side, because going down the mountain from the Salt Lake side meant waiting behind bicyclists for miles. Those guys and gals are crazy!!! It's very impressive that they are cycling up that mountain. I didn't see another cool car on the drive, so I think the cyclists have claimed this hill for now. 

Sunday, March 10, 2024

OLD CROW 3V Mustang: Suspension and Brake Upgrade and Test Drive!

 What a transformation!!! I'm so excited to share pictures of Old Crow all finished up! First, a beauty shot!

The car looks killerrrrrr!!!!! I just love it! It's exactly what I was hoping for and what I imagined in my head it could look like! The Vapor Silver is contrasted by the Gloss Graphite SVE R357 wheels and Gloss Black Front NuGeon (Brembo replacement calipers from Rockauto.com) 4 piston calipers with the 14" steel blank rotors (also from Rockauto). The brakes were fitted with PowerStop stainless steel brake lines which have a nice teflon outer layer that is a cool red textured color filled with Dot4 fluid and PowerStop "Track Day" pads up front. All of the brake parts were purchased from Rockauto.com, or as I like to call it, "Rockauto Speed Shop"! Ok, I'm getting ahead of ourselves...

Let's start by showing where we started with the front suspension.

So, we started with a 16 year old (2008) totally stock OEM front suspension and brake set up with 131,700 miles. The stock GT brakes are 2 piston calipers with 12.5" diameter rotors. 
Day #1 of the front end project was Wednesday March 6. We put in about 3 hours of work and we were able to essentially remove everything from both sides of the front end, including the front sway bar.

Day #2 was Thursday and again another 3 hours. We installed all the suspension, which included assembling the Koni single adjustable shocks to the Maximum Motorsports lowering springs from their "Road and Track Grip" kit to their MM caster/camber plates. We set the camber to the most negative setting that the OEM top strut opening would allow which ended being about -2.1 degrees. Caster was set towards the rear of the opening as far as we could go without affecting camber. We also installed the Eibach 36mm front sway bar with polyurethane bushings and GT500 lower control arms with poly bushing and upgraded (larger diameter) ball joint. 

Day #3 was Friday and we spent 4 hours installing new Ford Performance front hubs with ARP extended studs (which Corey painted with some black etching primer for rust protection during his lunch break), the full brake set up from Rockauto that I noted above in the intro. We installed the front SVE R357 wheels and Continental ECF tires for the first time and stood back and enjoyed the new view! To fit the 19x11 +50mm wheels upfront, I use a 19mm Cortex Racing black anodized wheel spacer. We then flushed/bled the brake system with the Dot4 fluid. We did a quick tape measure front toe alignment set at 0. 

Here are some great shots of the finished set up from behind the action and from the outside view. We set the bump steer kit so that the steering rod was parallel with the control arm. 


Here's the outside view of the set up. I do have to point out that the yellow and red parts go with the theme of P-51D "Old Crow" which had a yellow/red checkered nose livery. Perfect! I do have the idea to paint some lettering on the calipers that says "OLD CROW" but in "BREMBO" font, which you can download off the internet by the way. Future project haha

Here we are in the middle of bleeding brakes. Corey was in the car pushing the brake pedal, while I opened and closed the brake bleeder nut to allow brake fluid to empty into the collection baggy. 

Here was the first few minutes after we got the car all put together and on the ground. Corey's 2 post lift was incredibly valuable during the 4 day project. We had the car up and down many times, especially when dialing in the alignment.
Day #4 was on Saturday and we put another 2 hours in. In total we put in 12 hours each, or about 24 total hours between the 4 days. Corey and his brother bought a string alignment set up as Corey's brother is building a 1992 Chevy Camaro resto-mod and are doing much of the work themselves. While I was enjoying baseball games on Saturday, Corey was setting up the string equipment. Before doing the final alignment, stickaxlegang guru Ashley (Tribar Racing social media handle) pointed out to me that the passenger side flag bolt for the panhard bar was on the wrong side. After measuring, we need to move the rear end like 2-3mm toward the passenger side. So, we unbolted the panahard bar, moved it just a little. It needed one more round of adjustment and we had it centered up at ride height perfectly, within probably 1/2 a mm or less. It was almost perfect. We torqued up the mounting bolt, on the correct side this time and moved on to the front alignment.


The most tedious and time consuming part of the string alignment set up is getting the strings centered and level all around the car. Then you take measurements at the front and rear of the front wheels to check toe. We went through multiple iterations, lifting the car up and making minor toe adjustments. We got the toe to be right at 0, within less than 1/2 a mm or less. 

We went for a quick test drive and it drove straight and smooth. There was no rubbing at full lock (I'm really not low enough to be rubbing). The clearance between the inside of the wheels and the struts is very small, maybe 5-10mm or so. 

After confirming no weird noises or vibrations, we did some brake pad bedding. I should have taken a picture of the wheels after I got home. They were VERY dusty haha. The car stops great and the pedal feel was very solid. 

This morning, I couldn't help myself and went out for some beauty shots and a quick drive to Kaysville on the new highway. I felt like I was Lightning McQueen in the "Cars" movie driving on the brand new smooth road in my fully rebuilt Mustang. 

I'm just so happy with the results. The car looks incredible! The driving so far is proving to be very flat and the steering feels very sharp and responsive to inputs. It's going to be a blast at autox and track days! 


I'll wrap this post up with this Before and After. Or as the kids like to say "How it started...How it's going..." 

The difference is night and day visually and performance wise. The S197 Mustang was the last solid rear axle version of the car. After being the same basic suspension design from 1964.5 through 2014, I consider the S197 platform the "Modern Trans Am" Mustang. It has the same look and feel as the 67-70 Mustang Fastbacks but with modern improvements, such as: overhead cam/electronic fuel injected/variable valve timing V8 power and efficiency with a 5 speed (or 6 speed) overdrive transmission, bigger 4 wheel disc brakes (with ABS) and the modern crash safety structure (which improves chassis rigidity and thus handling). I think the 2005-09 Mustang was the best rendition of the late model Mustangs achieving that Retro-Futurism look. They nailed it! 

Stay tuned, because there's more to come. I have the "Hechtspeed Aero" front canards to install. I need to order up the next round of parts, which include Brenspeed JLT V3 Intake and SCT BDX tuner (about $780 total) along with an SVE axle back exhaust (about $300). I need to replace the 3ft long radio antenna with a short stubby version ($20). I want to do an MGW short shifter as well. Then down the road, I'm contemplating a Corbeau bucket seat. That means I'll have to ditch the heated leather seats. It will certainly help me take advantage of the improved grip and handling, but I'll lose the luxury haha.

Future future upgrades will include some kind of front splitter, heat extractor vents in the hood (need to decide if I want to keep the faux hood scoop or not). 1 piece aluminum driveshaft, maybe 3.73 gears (and paint the surface rusted rear axle and maybe get a nice aluminum diff cover). 

I still need to paint the replacement passenger fender and rear bumper I got as well. Corey and I will do that in his garage during warmer months (and after baseball season). 


Monday, February 19, 2024

OLD CROW 3V Mustang: Rear Suspension and Wheels and Tires installed!

 Big update in this post! PanteraCorey and I spent 5 hours Friday night and 3 more hours Saturday morning underneath the Old Crow to install all the rear suspension. Everything went pretty smoothly except for the removal of the upper control arm. When I watched a YouTube video the guy made it look like the upper arm would just come out once unbolted. False! haha After fiddling with it for awhile, we began slowly lowering the gas tank. I found another YouTube video and that guy said you're going to have to lower the tank. So, once we lowered the tank, boom! it came right out and the new Kenny Brown piece went in. 

Big shout out to Corey for allowing me to use his lift, tools and himself! I don't know how long it would have taken me to do that on my own or with my own tools. I know I don't have all the tools so I would have needed to borrow them or go buy some. 

Here it is up on Corey's lift Friday night


Here it is at my house today as I put my new wheels and tires on the rears. I adjusted the lower control arms because the pinion angle was -3 degrees. I adjusted it to -1 degree with shortening up of the LCAs. Corey and I had adjusted them to be longer than OEM on initial install. That was the wrong direction. 

When I test drove the car after initial install I could hear some rear end gear noise. I think that was due to too much angle. After a very brief test drive today, I didn't hear the rear end noise! Boom!

I still need to adjust the panhard bar a little. It's about 1/4" to the driver side. Brent says shortening the panhard bar will move it to the passenger side. I need an 18mm socket to unbolt the panhard bar so that will wait until Corey and I get it up on the lift next week, hopefully. 

Today I went to Harbor Freight and bought a 1/2" drive 50-150 ft-lbs torque wrench, some 1/2" drive extension and some bigger adjustable crescent wrenches so I could adjust control arms and panhard bar.

Luckily I had bought a slimmer 13/16" socket because the oem lug wrench doesn't fit my wheels lug hole openings. I've always tighten lug nuts by feel. I've never torqued them. I'm feeling official!
This is a great beauty shot! I'm purposely not showing the front end because its stock ride height and wheels LOL
This is a cool pic with it jacked up! I think the 2" MM lowering springs will be great for the street and a big improvement over the stock stuff when driving it hard.

And here's the Mullet Mustang shot! LOL 

Overall I'm really loving the look of the car with the new wheels and tires! The blacked out rear trunk panel, the rear spoiler, front lip and future canards look killer!!! I'm loving it so much!!!

I ordered a couple more parts. Corey convinced me to order the control arms and install them with the rest of the suspension. He's 100% right for saying so. I was fully planning on buying them in the future. I guess I was trying to keep the budget down but it just makes more sense to install these while everything, and I mean everything, is apart up front.


And, while I was at it, I threw in these matte black OEM+ looking headlights from LMR.com. I had a 6% discount from reviewing my other parts so I figured I'd get these ordered so they're here and ready when I do the front fender and rear bumper paint.

Stay tuned...


Wednesday, August 4, 2021

Ultimate Street Car Challenge comes to Utah Motorsports Campus (UMC)

 A few Friday nights ago, I was doing my usual Instagram surfing. I came across a post by @utahmotorsportscampus page that the Optima Search for the Ultimate Street Car was coming to Utah. I don't think it clicked when I first saw it. I didn't have any plans on Saturday, but the neurons didn't connect that I should try and go. I got up at my usual 630am on Saturday and tried to go back to sleep. I picked up my phone and saw another post about the USCC event. I think it was seeing the bright orange 1970 Camaro of bdhobaugh, it finally clicked. I started thinking that I could get out there in 45 minutes and be there for a few hours. I figured everyone would be sleeping for a few more hours and so they wouldn't miss me or be annoyed that I ruined their Saturday. This was a chance to see many of my hero cars. Here's some photos of cars I've only seen on YouTube or Instagram.


I should mention that the previous 2 weeks before I would be driving out to Grantsville-Tooele area to the Utah Motorsports Campus, I was dealing with a clutch issue on my 2002 WRX. I got the clutch working properly like 1 or 2 days before I would make the 100 mi roundtrip drive. So, I was a little nervous to be driving so far from home. The Suby drove great and had 0 issues. I rolled the windows down, cranked up the Beach Boys music, which is a Saturday tradition and enjoyed the 50 mile drive west. Here's a picture I grabbed of the UMC sign before exiting Tooele. You can see the Great Salt Lake out the window.


This photo was taken as I was leaving the campus. It really is a campus. They have the big road course, a go-kart track, a couple off-road tracks for stadium trucks and motoX and a couple parking lots where they had AutoX for the Drive Optima event and a local drift event on the other side of the property. 

The suby is a good lookin' car eh? I love the simple silver on silver look! I love the Enkei NT-03M wheels too! Those "Falken" tire letters are holding on tight... hhhhhhhh :( Can't wait when they start to peel or I replace them with new tires.

Let's start off with the most recognizable car for me, Brian Hobaugh's 1973 monster Camaro. Just google this car and you will find feature articles for it going back to 2012. It has continued to evolve. It's a seriously cool machine! It sounds and looks aggressive. 


Hard to pick which one to go with next, but I'm going with this 1970 C3 Corvette nicknamed "Rambo"!
Rambo Pro-Touring C2 Vette article.
Read that article for more details and watch the video. The highlights include a 450hp LS6, T56 6 speed and JRI coilovers (best in the biz)! I love the green paint and fender flares. Serious cool grip machine!


Continuing with the 1970's Chevy theme, check out this 1969 K5 Blazer.
Laid-Back K5 Pro-Touring Blazer article.
Thank you to AutoXandTrack.com for putting up this article and for all the great YouTube video content from many autox and track events in the Southwest/California area. I'm a huge fan!
This Blazer is actually from Idaho and had its engine done at JDP Motorsports, which is based out of Salt Lake City, Utah. How about a SpeedTech frame, 560hp LS3 and 315/335mm wide tires front and rear! Beautiful hot rod!


OK, time for a Ford. John McKissack's 1966 Ford Fairlane is rad! He's nicknamed it "Riverside Spec" and you can find "RS" decals in a few places. Check out AutoXandTrack.com's YouTube video here: In The Paddock Ep.6 Video
Here's the highlights: 427 Dart block, T56 6 speed, JRI shocks with Mike Maier cantilever torque arm suspension, 18x12 wheels and 315/30/18 stickies! Nuff said! I love the flares and aggressive stance!


This S197 Shelby GT500 was very fast and finished in the top 5 for the entire event! I don't have any details, but it stood out and was one of the many modern Mustangs. 
What was odd was there was 0 Mustangs pre-Fox body. And there was only 1 Fox body Mustang. I found that kind of odd. I feel like there are way more 60's Mustangs (especially 64-66 model years) driving around the streets compared to 67-73 Camaros, but on track, there seems to be the opposite scenario. Not sure why that is?


Here are a few more hot rods that I was diggin. I'm not sure what it is, but I love Pro-touring hot rod trucks from the 60-70's. I'm also a big fan of the modern Camaros, especially the 2016 and newer with the newer chassis (aka lighter chassis).