Showing posts with label 3v. Show all posts

Saturday, October 26, 2024

OLD CROW 3V Mustang: Buttonwillow CW13 The Photo!

 This photo deserves its own post. Cali Photography is out on the track taking photos of every single car on track and you can buy package deals for like $90 or you can buy your first individual photo for $25 and then any additional photo for $15. Most of the photos looked at this basic angle of the car and I liked this one the best because it looked like a good action shot, coming down the small hill, more like a bump, on the section of the track at Buttonwillow Raceway Park called "Grapevine". 

This photo represents the last 20+ years of dreaming of tracking a car, of all the hours watching YouTube videos of cars running CW13, all the planning and scheming and wishful thinking during my ownership of my other cars, especially the last few, the Silver 2002 WRX, the red Civic EK Hatchback, but even the 330Ci BMW that I autocrossed and all the way back to my first 2002 WRX which I modified a good amount and took to Miller Motorsports Park back in like 2010 for a Wide Open Wednesday event. I would say what got me over the edge to actually do a track day was my brother Brent, who paved the way by tracking his red 2005 Mustang GT RED BARON and his encouragement and example. I just copied him and it 100% worked like a champ to get me out there! 

I'm planning to do a Track Day out at UMC (Utah Motorsports Campus) next year! 

Enjoy!


Thursday, March 28, 2024

OLD CROW 3V Mustang: JLT V3 CAI + SCT BDX Brenspeed customer 91oct Tune

 The fun continues! A week or 2 after getting the suspension installed, I ordered up the next round of parts for the Old Crow 3V Mustang Project!

Brenspeed is known for being one of the top 3V Mustang tuners and aftermarket providers. I ordered up their Intake + Tuner Combo kit. They have a few options and I chose to go for their most affordable set up, which includes the JLT Performance V3 Cold Air Kit and the SCT BDX programmer device. The out the door and shipped cost was $807 for the kit. After ordering, they send you an email and request some details about your car. I sent them all my mods along with rear gear ratio and tire diameter. 

If you didn't know, the 3V 4.6L Mustang GT absolutely requires a tune if you install a cold air kit on it. There are all kinds of warnings in the paperwork that came with the intake to ensure a tune is uploaded before running it. 

Here's a pic of the JLT intake installed along with some in-process pictures of the tune upload.
The intake install was fairly straight forward. The hardest part was mounting the heat shield bolt between the radiator and fan shroud. The PCV hose was easy as well. I took my time getting the intake mounted to the throttle body right. I wanted to make sure the seal was done well so there were no air leaks and so it won't move or fall off over time. Because the intake tube is plastic, the instructions said to not over tighten the clamps. The heat shield fits snug against the hood when you close the hood. I'll keep an eye on it over time to see if its wearing the underside of the hood at all. The overall look of the engine bay is much improved by installing the intake compared to the clunky and dirty/grungy stock airbox. I need to get those valve covers painted at some point in a nice bright Ford Blue!
So, I was a little nervous about the upload process. The instructions weren't actually very helpful. SCT provides a fold out map like page and it talks about like 6 different general processes. But, I followed the screen and clicked through and turned the key on and off when it told me and SUCCESS!!! Brent did instruct me to have a charger going on the car battery just in case. He said if the car battery doesn't have enough power during the upload and if something happens mid upload, you could brick the ECU or at least, put yourself in a difficult situation LOL. So I borrowed Corey's battery charge (again!) and the upload completed with no issues.

I went for a quick test drive when I finished at like 10pm. I could feel the car was snappier and more responsive and that it definitely had more power. The intake noise when you do a quick down shift blip or really dig into the throttle gives a sucking/whooshing sound now that wasn't there before.


So, here's the parts I bought, in addition to the Intake and tuner. I ordered up the LMR.com SVE branded axle back exhaust and the Pypes after cat X-pipe. This x pipe is clamped into place behind the factory cats. You have to cut the pipes behind the cats and clamp the x pipe on and connect it to the rest of the catback piping. So, its a hopped up version of the factory 2.5" exhaust system. 

I also picked up the MGW short shifter. It is supposed to arrive on Saturday. The shifter has adjustable throw. I've matched that up with a Billetworkz matte black weight shift knob in the "lightbulb" shape (Brent really wanted me to do the sphere shape but I felt it was too bulky). I also ordered the boot retainer piece, which comes in gloss black to help it look factory with the shift boot held in the proper position. It did cost $30 but hey, there's some showcar boi in me too! haha


Here's some pics of the SVE axle back mufflers from LMR.com. Here's a comparison of the 16 year old OEM mufflers. The SVE mufflers save 7 lbs each side. So far, the parts I've added have lost some weight overall. I need to find the weight of the GT500 arms because they are heavier than the OEM GT arms, but besides that, I've removed 60 lbs from the car but then added back in 8lbs of heavier wheel/tire combo (2lbs per corner).

I love the look of the new SVE mufflers. More aggressive, sporty look with the 4" tips and a nice shiny polished SS. 
You can see from these under car pictures that the smaller size of the mufflers give you more room underneath to work. 
While I was under the car, I took the time to wipe down with a soapy wash rag the underside. 


I also picked up this 8" short antenna. It only cost $15 and I think improves the look more than you'd think. That big tall antenna screamed 80's!


Saturday, December 9, 2023

OLD CROW 3V Mustang: Front lip installed (LMR Series 3 Chin Spoiler)

 Ok, I finally did a modification to the Mustang with my own hands! Today the LMR front lip spoiler was installed, thanks for my buddy Corey. Once the car was up on stands and front wheels off, it probably took an hour or so. Really not too bad. It looks great!


LMR has a nice short YouTube video that briefly shows how to install it. That was pretty helpful. 


I'm really annoyed by the dented fender now haha. I was already bugged, but for some reason all my close up pics are from this damaged side haha.

The install includes 2 small screws on the inside of the wheel wells and then 4 screws that keep the underside of the front bumper fastened to the car. Those 4 holes were removed and used to fasten the lip to the bumper. The lip came with 8 more screws. We used 3 more to to make the lip even more solid to the bumper. I can add more but I'm not sure where they'd go, so we'll go with this for now and see how she does.


Saturday, December 2, 2023

RED BARON 3V S197 Mustang Track Car: 315/30/19 Square mounted!

 Another update on Red Baron! The new Continental ECF in 315/30/19 showed up and were installed yesterday. New/used 14" Giro Disc rotors installed up front and paint stripped from the calipers. Here's some beauty shots Brent shared last night that I had to put up. The wider tires are noticable in the look of the car. It was too cold to push the car to get a feel so that will have to wait.

Also installed were some adjustable front sway bar end links by Shelby. The 400lbs rear springs were also installed, replacing the 300lbs springs. With the big rear wing and wider tires, this change should suit the car nicely on track.

To fit the wider tires, Brent went with a 20mm spacer, up from 19mm. The camber plates were maxed out at about -3 degrees, which necessitated grinding the opening on the strut tower to allow the top of the strut to move inward a little more. The alignment was straightened out and a test drive confirmed all was ready to rock. The bigger 13.5" GT500 sized rear rotors using the stock calipers with a bracket to make it all work will be installed today since the rotors were arriving today instead of yesterday.

Enjoy the pics! Brent is hoping that these latest changes can get the car down to a low 1:57 lap time at CW13 in a couple weeks.


Saturday, November 25, 2023

RED BARON 3V Mustang Track Car: V2 Canards are finished, Beauty Shots!

 Brent just sent along some beauty shots after he finished and installed the V2 canards. Before the beauty shots, let's see a couple in process photos.

Here's a picture of the V2 canards mid lay up on the car. 

Here they are with bondo applied and ready for body work.

Here's an in process pic during the body work step.

Painted and ready for final installation.

Da' beauty shots!!!

So much going on here! The new canards really finish the look up front. In this light, you can see the Watson roll bar showing off and harnesses too.
That serious track car face from the front view. Roll bar saying "Look at me!". 
Day light front view! I like the blacked out fog light housings here. Very "Mach 1" - esque.
3/4 front view here with those Tehachapi Mountains and desert juniper giving a nice background.

I really like how the canards and front splitter work together from all views. Red lower control arm mounting brackets are a nice touch matching the red body color. 

Next up? 315/30/19's were ordered a few days ago. Brent is looking to get to the MDC (Mustang Drivers Clud) event at Buttonwillow CW13 on December 16 or if that doesn't work out, the end of January event. He's hoping for or thinking he can set a new PB at around 1:57 or maybe a really high 1:56. ;)
Oh, adapter bracket for running the larger rear GT500 brake rotors (13.5"?) using the stock GT calipers was ordered up on a Black Friday deal since the rear rotors were due for replacement. All the upgrades!!!


OLD CROW 3V Mustang: Bolognas Arrive and Wheel Test Fit!

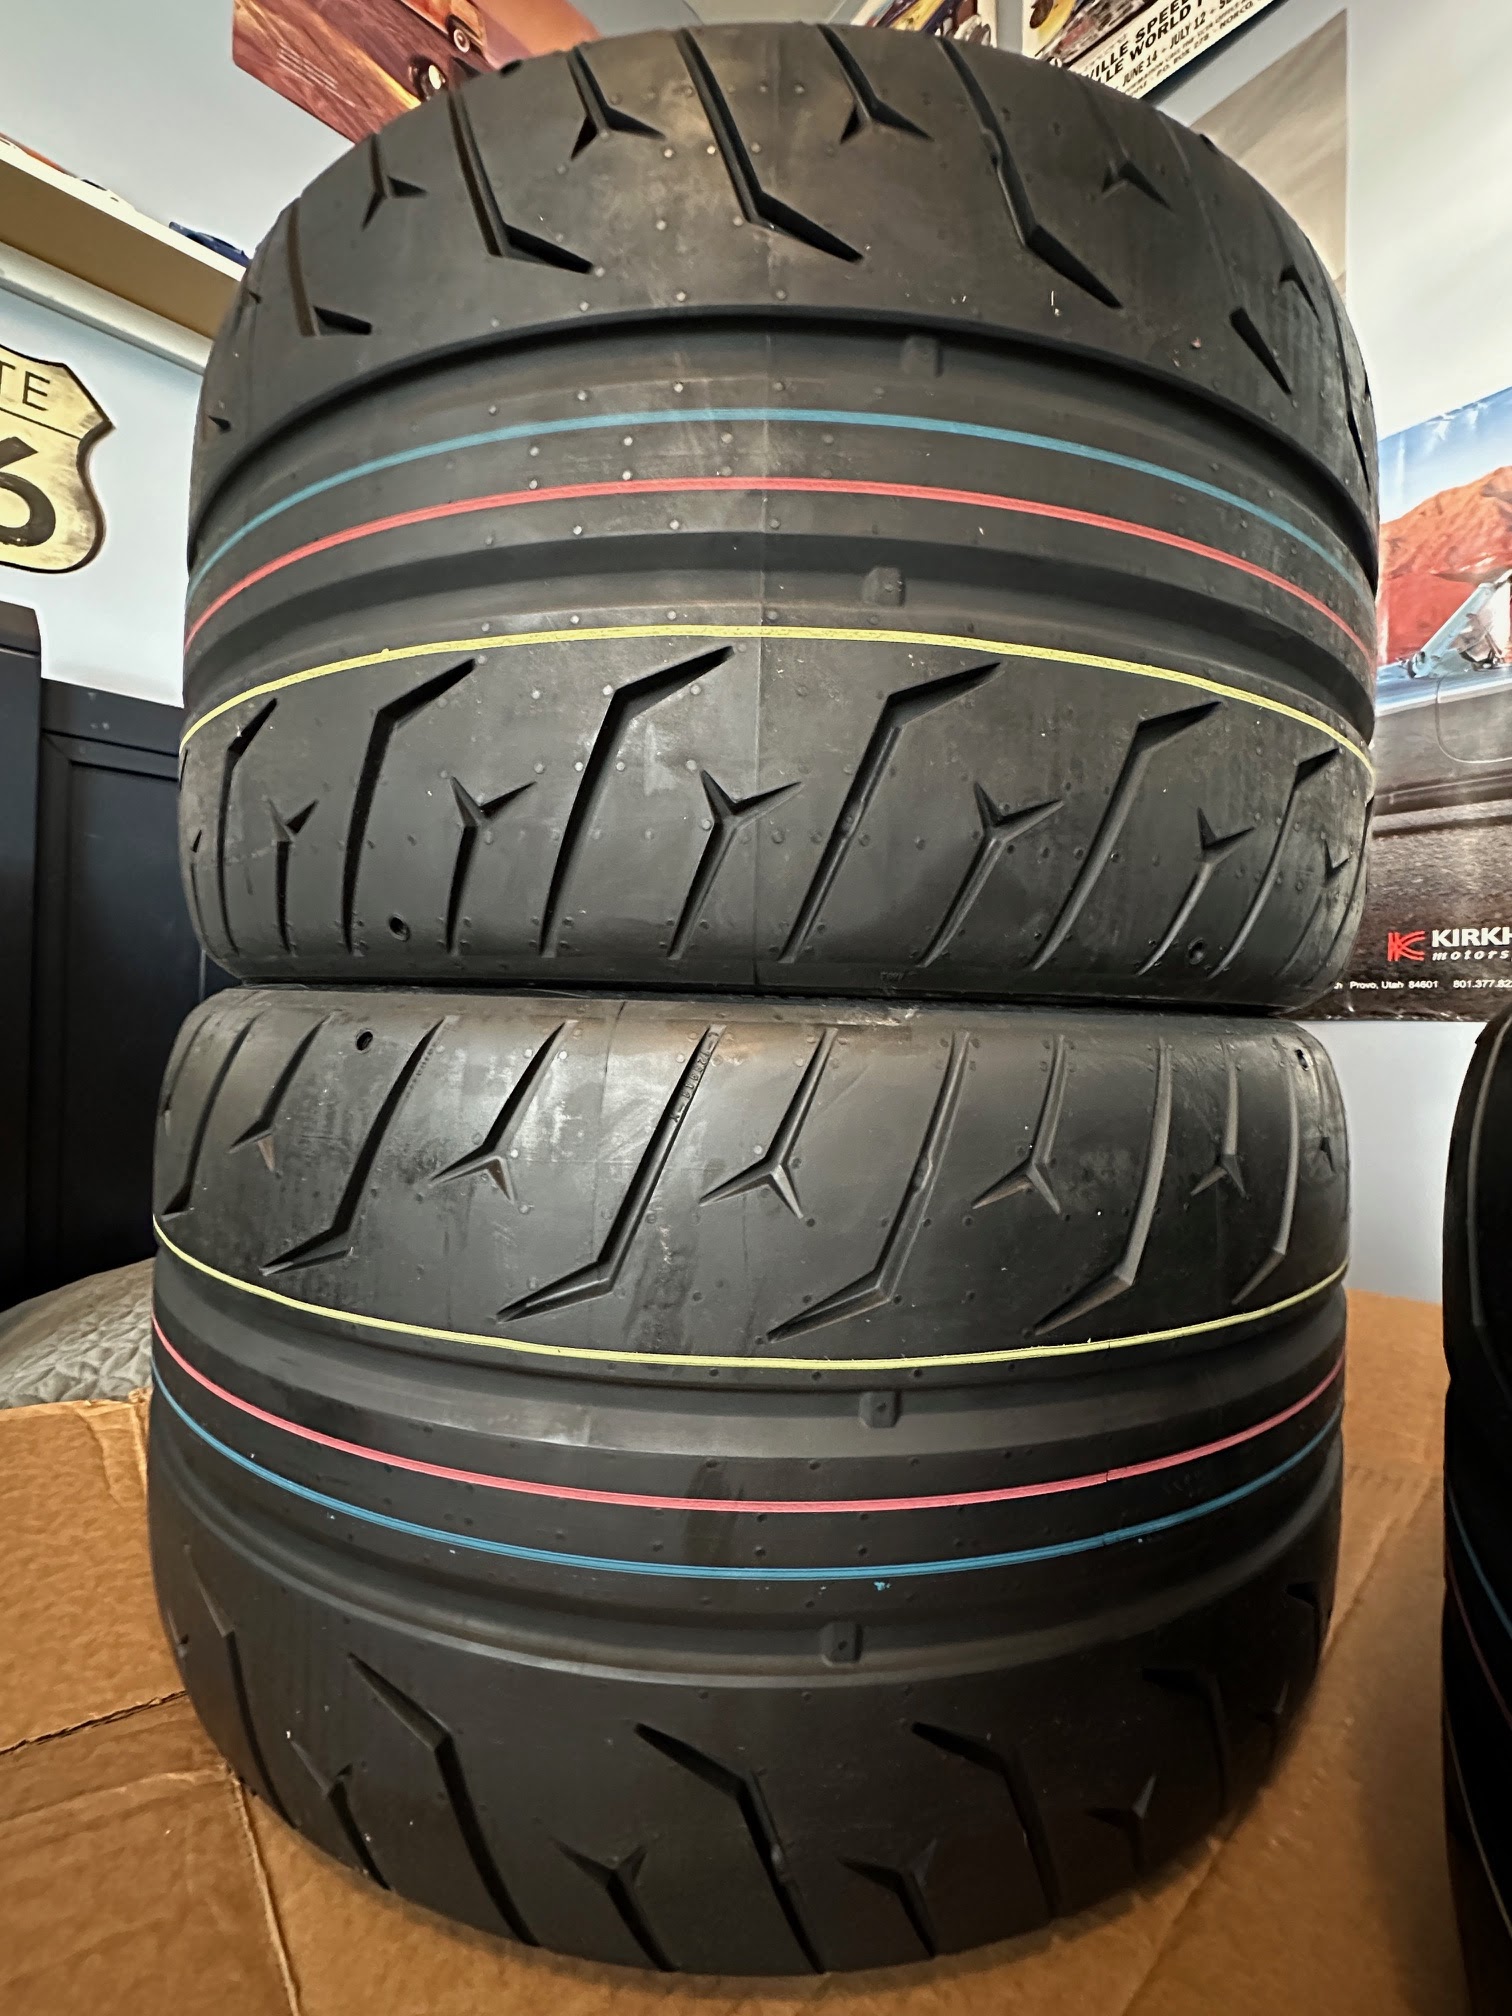
 The bolognas have arrived! Arby's, we have the meats! The Hecht boys have called big tires meats or bolognas (pronouced boh-log-nuhs) for decades! These are the biggest wheels and tires I have ever had on a car. The tires showed up today and so of course, we had to unbox them and check them out, make sure they're all the right size, etc.

Ok, the first money shot of this blog post is 2 of the Conti meats stacked with the iPhone wide angle lens!!! So sick!!!! Grippy bois!!!


Here I am with a pic of my tires. Big smile! I did weigh the Continental ECFs and they measured 27.6lbs. With the SVE R357 wheels weighing 22.8lbs, that brings us to a combined weight of 50.4lbs. I did weigh the stock 17s and oem tire size and they weighed 48.6lbs. So, that is a 1.8lbs increase with the new bigger/wider setup. 

SVE R357 19x11 +50mm / Continental ECF 295/30/19 = 50.4lbs
OEM 17x8 / Michelin all season 235/55/17 = 48.6lbs

Here's a couple pics when they arrived from the FedEx truck today.


Tight fit in there!

Of course, I had to set one next to the stockies! That's a sizeable increase in width! Love it! The tread pattern looks so aggressive too! I've always cheesed out and bought the cheapest all seasons I could find on eBay. I think the most I had spent on tires before this was like $650 for the bimmers set of Accelera 265/35/18 and 245/35/18 tires on 18x9.5 and 18x8.5s. The last Suby had 18x9.5 with 255/35/18 Falken FK510s but I didn't buy those.

So, after I picked up the last of the fall leaves (24 bags give or take this year yikes!), I decided to jack the Crow up and test fit the wheels.

Here's a not so great view of the rear wheel fitment. It has maybe 3/8" of an inch clear with the oem strut. Crazy how the lower control arm mounting structure fits inside the wheel. 
Had to get this shot with this angle of the rear spoiler!
Front quarter view!
At first I was just gonna put this one on the rear. But the stock 17" was looking so lame I had to go get another one to put on the front.
This view is my new desktop background for my laptop! haha It looks killer guys!!! The front wheel is resting on the studs, not fully seated. The inner lip of the wheel is sitting on the front strut. LOL I knew that would be the case. 

I love the color combination of the Vapor Silver Ford color with the Gloss Graphite wheel color! I will honestly say, before I finalized my color choice on the wheels, I was wondering if it would be too much silver color. As you can see, the color is a nice contrast. The wheels are dark enough to give good contrast but the gloss and metallic in the wheel really highlights the spokes in different angles and lighting. It looks awesome!!!

While I was at it, I detailed with the car after dusting it with my "California duster" I've had for 22 years or so.

My last comment here is I really love this Vapor Silver color on the 2005-2009 Mustang. Every body panel and feature pops with a different shade of silver. It really highlights the body shapes and design. With Brent's buff job the other week, she's looking great!


Friday, November 24, 2023

Red Baron 3V Mustang Track mods: Roll bar and canards

 Black Friday update here. Brent installed the Watson 4 point bolt in roll cage along with some 5 point harnesses. It required removing the rear interior panels and rear seat to gain access to the mounting locations for the roll bar. 

Brent posted a YouTube video HERE of the install. Check it out!

After selling me his original canards, he fabbed up some new ones. Here's a couple in progress pics.

Here is a poster board template for testing.

Here is the in process lay up phto. You'll also note the hood pins are a new addition. 

Brent also took advantage of the buy 3 get 1 free discount code over at TrackDayTire.com and bought a set of 315/30/19 Continental ECFs for the next track day. Gotta have fresh rubber for that first track day to set the best PB possible. ;) We shall see how the fitment of 315mm wide meats goes soon.

I just checked tracking and looks like my 295/30/19 Contis are supposed to arrive tomorrow. 


Tuesday, November 21, 2023

OLD CROW 3v Mustang: Wheels arrived and Suspension Plans

With wheels and tires purchased, the next step in the modification process is to pick up suspension goodies!

First, before we get to suspension, a few pics of the big boy wheels that showed up this week!


None of these pictures do these wheels justice. They are way more concave and wide in person. 

To actually fit this wide of a wheel and tire up front, there are a few small things we need to do. For a good reference, you need to check out apexwheels.com and find there "Wheel and Tire Fitment Guide" page (click the link to check it out!). They give the basic guidelines for the various widths. The issue is that the inside of the wheel will contact the strut body, so we need to use a spacer to push the wheel away from the strut for clearance. Brent uses a 19mm spacer. That is what was recommended by Ashley (Tribar Racer on Facebook) who has been competing with the S197 since it debuted in 2005. 
To run a spacer, we need to run extended wheel studs. The ARP studs are what most guys run, so that is the plan there. Since the car has 131k miles, a good way to go, which simplifies the install as well is to buy the whole hub assembly that comes with ARP studs from Ford Performance. You can get these all the big Mustang online stores like LMR or AmericanMuscle.
Now that we have clearance for the inside of the "wide bois", we need to clear the fender lip on the outside of the wheel. Here's another 2 birds, 1 stone step. We need to dial in more negative camber. See below for Maximum Motorsports camber plates. By running more aggressive negative camber, this achieves clearance for the fender and wheel/tire but also improves cornering by keeping the tire more flat to the road surface as the suspension is compressed and the front McPherson strut geometry goes through its arc shaped path, it remains more flat. If you stuck with OEM camber settings (-1.0 degree of camber or less), when the the outside tire compresses the suspension, it will actually want to lift the inside of the tire off the ground, losing contact with the road and thus losing grip. 
This increase in negative camber to about -2.7 degrees (as noted in the Apex Wheels Fitment guide) will help the wheel/tire clear the fender and also improve cornering ability. Win win!!

Here's a quick picture of Brent's Red Baron and his front camber. ;)

 Ok, maybe this pic doesn't quite show the front negative camber like I thought it was going to, but daaaaaannngggg, check out this thang! More to follow on Brent's latest changes in the next blog!

Ok, so, camber, spacer, longer wheel studs inside new hubs, check. That is just to fit the wide bois up front and give some more camber. The rest of the suspension is a longer story. 

Luckily, Maximum Motorsports makes a package or kit that gets us 90% the way there on suspension. It's called the "Road & Track Box" (click that link!) and they have it for a few generations of Mustang, including us S197 peeps.
So, here's the parts list:
  • Maximum Motorsports Road & Track Spring set (about 2.0" drop, 320-360lb-in Front, 260-380lb-in Rear spring rates)
  • Koni shocks and struts (non-adjustable)
  • Maximum Motorsports Camber Plates (help dial in more camber)
  • Eibach 36mm 3-way adjustable front sway bar
  • Maximum Motorsports polished aluminum adjustable panhard bar (spherical rod ends)
  • Maximum Motorsports aluminum rear lower control arms
  • Maximum Motorsports front and rear bump stops and Ford strut/spindle bolts
This kit costs about $2400. That's as much as I spent on wheels and tires. You gotta pay to play as they say. Ok, there's a couple more parts we want to do for the rear suspension.

As recommended by Ashley, we want to do the rear lower control arm relocation brackets from KennyBrown.com. These are also called "anti-squat" brackets. They lower the roll center (aka pivot point) of the cars rear suspension. Mustangs are known for the nose diving down when under hard braking. This is part of that geometry from the factory. These brackets relocate the rear mounting point of the rear lower control arms and helps reduce dive and improves squat coming out of corners.

One more part needed from the KennyBrown catalog is the rear upper control arm or U-link its also called.

Here is the explanation from the KennyBrown site on what they did with the upper arm, "Kenny lengthened the upper control arm to reduce SVSA (side-view swing arm) instant center migration for more stable and predictable handling, grip and braking."


It's light, strong and improves geometry. The webpage notes: "IMPORTANT: 2005-2010 Mustangs REQUIRE upgraded FORD Upper Control Arm Upper Bolt, part #FOR-W714389S439"


So, we're looking at $180 for the lower brackets, $400 for the upper control car/U-link and $9 for upgraded bolts.
So, we're now up to about $3000 for suspension mods. We'll want to do front bump steer parts ($180 for bump-steer tie rods) as well up front. And Steeda makes an upgraded front lower control arm with bigger ball joints and stiffer bushings, that's $700. Cha-ching!


So, that's the plan! These parts along with the wide wheels and tires and negative camber will transform the handling of the Mustang and drop it about 2". Old Crow will look and handle amazing! Can't wait to hit some autox events this summer/fall in 2024.